Showing posts with label Tutorial. Show all posts

Unity3D How To Create A Simple Countdown Timer

Unity3D How To Create A Simple Countdown Timer

I needed a simple countdown timer to create a splash screen effect so I could jump to the next scene. In this example, I create a time governor that loops and keeps checking to see if the time has expired ( <= 0 ) then executes the actions.

Set Total Countdown Time

In your class create a float variable that will be the total amount of time to countdown and the reset time holder:
public class CountDownTimer : Monobehaviour {

float timeRemaining; // the timer
float timeRemainingReset; // the timer reset

Add To A Main Update Loop

Add this code to any of your main update loops (Update, FixedUpdate, LateUpdate):
void Update() {
     timeRemaining -= Time.deltaTime; // subtract time each frame

     if( timeRemaining <= 0 ) {
          // reset the timer
          timeRemaining = timeRemainingReset;
          // perform your actions (load next scene, move a gameobject, perform garbage clean up etc.)
          HealPlayer();
          CheckCombat();
     }
}

Unity3D How To Create A Simple Countdown Timer

Yet Another State Machine

Unity3D Yet Another State Machine

If logic in your controller to complex for ‘if’ or ‘switch\case’ constructions, here is small State Machine implementation for you.

Let’s start with example how to use this state machine, and then we go through implementation details:
public class Test : MonoBehaviour
{
    private StateMachine stateMachine;
 
    private State firstState = new State();
    private State secondState = new CustomState();
    private State finishState = new State();
 
    // Use this for initialization
    void Start ()
    {
        var initChild = new State()
            .AddStartAction(() => Debug.Log(Time.frameCount + " childInit Start"))
            .AddUpdateAction(() => Debug.Log(Time.frameCount + " childInit Update"))
            .AddStopAction(() => Debug.Log(Time.frameCount + " childInit Stop"));
        var childStateMachine = new StateMachine(initChild);
        stateMachine = new StateMachine(firstState);
 
        firstState
            .AddStartAction(() => Debug.Log(Time.frameCount + " 1 Start"))
            .AddUpdateAction(() => Debug.Log(Time.frameCount + " 1 Update"))
            .AddStopAction(() => Debug.Log(Time.frameCount + " 1 Stop"))
            .AddTransition(
                state => Time.frameCount == 5, 
                secondState)
            .AddTransition(
                state => Time.frameCount == 15,
                secondState);
 
        secondState
            .AddTransition(
                state => Time.frameCount == 10,
                firstState)
            .AddTransition(
                state => Input.GetKey(KeyCode.Q),
                childStateMachine);
 
        childStateMachine
            .AddTransition(s => Input.GetKey(KeyCode.Y), finishState);
 
        finishState
            .AddStartAction(() => Debug.Log(Time.frameCount + " finish Start"));
 
        stateMachine.Start();
    }
 
    void Update()
    {
        stateMachine.Update();
    }
}
 
public class CustomState : State
{
    public CustomState()
    {
        StartAction = CustomStart;
        UpdateAction = CustomUpdate;
        StopAction = CustomStop;
    }
 
    public void CustomStart()
    {
        Debug.Log(Time.frameCount + " custom start");
    }
 
    public void CustomUpdate()
    {
        Debug.Log(Time.frameCount + " custom update");
    }
 
    public void CustomStop()
    {
        Debug.Log(Time.frameCount + " custom stop");
    }
}

Each state might have couple Start, Update and Stop actions. You can add them through AddStartAction\AddUpdateAction\AddStopAction methods. Those actions are not required, so state could have only Start and Update, but not Stop action, or could be even without any actions.

Also, each state might have transitions. To add them use AddTransition method. It takes predicate and next state as arguments.

If state machine is in a some state it will check all registered transitions of the current state. If any of conditions return true, it will go to next state and will call all actions Stop for current state and Start for next state.

If current state has transitions, but all conditions return false, state machine just call Update action of the current state and will check transitions again only in the next frame.

Here is State and StateMachine implementation:
public class State
{
    private readonly List transitions = new List();
 
    protected Action StartAction { get; set; }
    protected Action StopAction { get; set; }
    protected Action UpdateAction { get; set; }
 
    protected internal bool IsStarted { get; set; }
 
    protected internal void Start()
    {
        if (!IsStarted && StartAction != null)
        {
            StartAction();
            IsStarted = true;
        }
    }
 
    protected internal void Update()
    {
        if (IsStarted && UpdateAction != null)
        {
            UpdateAction();
        }
    }
 
    protected internal void Stop()
    {
        if (IsStarted && StopAction != null)
        {
            StopAction();
            IsStarted = false;
        }
    }
 
    public State AddStartAction(Action startAction)
    {
        StartAction += startAction;
        return this;
    }
 
    public State AddUpdateAction(Action updateAction)
    {
        UpdateAction += updateAction;
        return this;
    }
 
    public State AddStopAction(Action stopAction)
    {
        StopAction += stopAction;
        return this;
    }
 
    public State AddTransition(Predicate condition, State nextState)
    {
        transitions.Add(new StateTransition(condition, nextState));
        return this;
    }
 
    public bool CanGoToNextState(out State nextState)
    {
        for (int i = 0; i < transitions.Count; i++)
        {
            if (transitions[i].Condition(this))
            {
                nextState = transitions[i].NextState;
                return true;
            }
        }
 
        nextState = null;
        return false;
    }
 
    public bool HasNextState()
    {
        return transitions.Count != 0;
    }
}
StateMachine:
public class StateMachine : State
{
    private readonly State initialState;
    public State CurrenState { get; private set; }
 
    public StateMachine(State initialState)
    {
        this.initialState = initialState;
        StartAction = Start;
        UpdateAction = Update;
        StopAction = Stop;
    }
 
    public new void Start()
    {
        if (IsStarted)
        {
            return;
        }
 
        CurrenState = initialState;
        CurrenState.Start();
        IsStarted = true;
    }
 
    public new void Update()
    {
        if (CurrenState == null)
        {
            return;
        }
 
        if (!CurrenState.IsStarted)
        {
            CurrenState.Start();
        }
 
        CurrenState.Update();
 
        State nextState;
        while (CurrenState.CanGoToNextState(out nextState))
        {
            if (CurrenState.IsStarted)
            {
                CurrenState.Stop();
            }
 
            CurrenState = nextState;
 
            if (!CurrenState.IsStarted)
            {
                CurrenState.Start();
            }
 
            CurrenState.Update();
        }
 
        if (!CurrenState.HasNextState())
        {
            Stop();
        }
    }
 
    public new void Stop()
    {
        if (CurrenState == null)
        {
            return;
        }
 
        if (CurrenState.IsStarted)
        {
            CurrenState.Stop();
        }
 
        CurrenState = null;
    }
}
As you can see, you can easily extend State by inherit from State class and specifying Start\Stop\Update actions. You can also use StateMachine as a State, so you can create hierarchical structure.

Unity3D Yet Another State Machine

How-To Play Video in Unity Project Using MovieTexture

Unity3D How-To Play Video in Unity Project Using MovieTexture

If you want to play movie clip in your Unity3d project you need to have Pro version!

If you are using Windows machine you also need to have QuickTime installed.

After you have everything prepared just drag (or copy) your movie clip into Asset folder, after that you will see it imported.

You need a MovieTexture instance to use imported clip. To play movie clip use following code:
MovieTexture movie;
public void Play()
{
    movie.Play();
}

To stop or pause:
movie.Pause();
movie.Stop();

You can access audio clip through audioClip field:

var audio = movie.audioClip;
Importing problems

First, check if you have Apple Quick Time installed.

If you working with a team, it might be a problem when someone imported videos in the project, but you still see them as a simple files. To fix that just select movies and reimport them. For some reason, Unity doesn’t do that automatically.

Unity3D How-To Play Video in Unity Project Using MovieTexture

Unity ReadOnly InputField

Unity3D ReadOnly InputField

New UI system was introduced in Unity3d 4.6, it includes InputField control, but this field could not be read only. You can make it non interactable by disabling “Interactable” property in the editor, but then you will not be able to select and copy text from InputField.

To have proper ReadOnly input field you should do small modification to the original control:
using UnityEngine;
using UnityEngine.EventSystems;
using UnityEngine.UI;
 
[AddComponentMenu("UI/Read Only Input Field", 32)]
public class ReadOnlyInputField : InputField
{
    private Event m_ProcessingEvent = new Event();
 
    public override void OnUpdateSelected(BaseEventData eventData)
    {
        if (!isFocused)
            return;
 
        bool consumedEvent = false;
        while (Event.PopEvent(m_ProcessingEvent))
        {
            if (m_ProcessingEvent.rawType == EventType.KeyDown)
            {
                if (!IsAllowedCombination(m_ProcessingEvent))
                {
                    continue;
                }
 
                consumedEvent = true;
 
                var shouldContinue = KeyPressed(m_ProcessingEvent);
                if (shouldContinue == EditState.Finish)
                {
                    DeactivateInputField();
                    break;
                }
            }
        }
 
        if (consumedEvent)
        {
            UpdateLabel();
        }
 
        eventData.Use();
    }
 
    private bool IsAllowedCombination(Event evt)
    {
        var currentEventModifiers = evt.modifiers;
        RuntimePlatform rp = Application.platform;
        bool isMac = (rp == RuntimePlatform.OSXEditor || rp == RuntimePlatform.OSXPlayer || rp == RuntimePlatform.OSXWebPlayer);
        bool ctrl = isMac ? (currentEventModifiers & EventModifiers.Command) != 0 : (currentEventModifiers & EventModifiers.Control) != 0;
 
        switch (evt.keyCode)
        {
            case KeyCode.Home:
            case KeyCode.End:
            case KeyCode.LeftControl:
            case KeyCode.RightControl:
            {
                return true;
            }
 
            // Select All
            case KeyCode.A:
            {
                if (ctrl)
                {
                    return true;
                }
                break;
            }
 
            // Copy
            case KeyCode.C:
            {
                if (ctrl)
                {
                    return true;
                }
                break;
            }
 
            case KeyCode.LeftArrow:
            case KeyCode.RightArrow:
            case KeyCode.UpArrow:
            case KeyCode.DownArrow:
            {
                return true;
            }
        }
 
        return false;
    }
}

Now you can add this component to your control or replace InputField component with this one on existing game object.

Unity3D ReadOnly InputField

Unity WaitForFrames in Coroutine

Unity3D WaitForFrames in Coroutine

If you are using Coroutines in Unity3d, you probably know about WaitForSeconds, WaitForEndOfFrame and WaitForFixedUpdate classes. Here is an example:
public IEnumerator CoroutineAction()
{
    // do some actions here    
    yield return new WaitForSeconds(2); // wait for 2 seconds
    // do some actions after 2 seconds
}

But sometimes you need to wait for some amount of frames before executing some action. I have created simple class to help you with that:
public static class WaitFor
{
    public static IEnumerator Frames(int frameCount)
    {
        if (frameCount <= 0)
        {
            throw new ArgumentOutOfRangeException("frameCount", "Cannot wait for less that 1 frame");
        }
 
        while (frameCount > 0)
        {
            frameCount--;
            yield return null;
        }
    }
}

Now you can wait for frames:
public IEnumerator CoroutineAction()
{
    // do some actions here    
    yield return StartCoroutine(WaitFor.Frames(5)); // wait for 5 frames
    // do some actions after 5 frames
}

Unity3D WaitForFrames in Coroutine

Unity Horizontal Field Of View for Camera

Unity3D Horizontal Field Of View for Camera

In Unity3d you can change only vertical field of view for a camera by default. This means whenever you change height unity will automatically scale environment. But if you change width unity will just add some space (or decrease) to left and right side of the screen (no content resizing).

If you want to have opposite behavior, so when you increase width all content will be scaled and if you increase height only space added to the view, you need to modify camera fieldOfView field.

Here is a simple component that do this:
public class HorizontalFOV : MonoBehaviour {
public float fieldOfView = 60;
  
void Update () {
    camera.fieldOfView = fieldOfView / ((float)camera.pixelWidth / camera.pixelHeight);
    }
}

You can also modify it a bit to have the same view for default aspect ration:
public class HorizontalFOV : MonoBehaviour {
public float fieldOfView = 60;
  
void Update () {
    camera.fieldOfView = fieldOfView * (16f/9f) / ((float)camera.pixelWidth / camera.pixelHeight);
    }
}

Unity3D Horizontal Field Of View for Camera

Unity Basic Low Poly Shader

Unity Basic Low Poly Shader

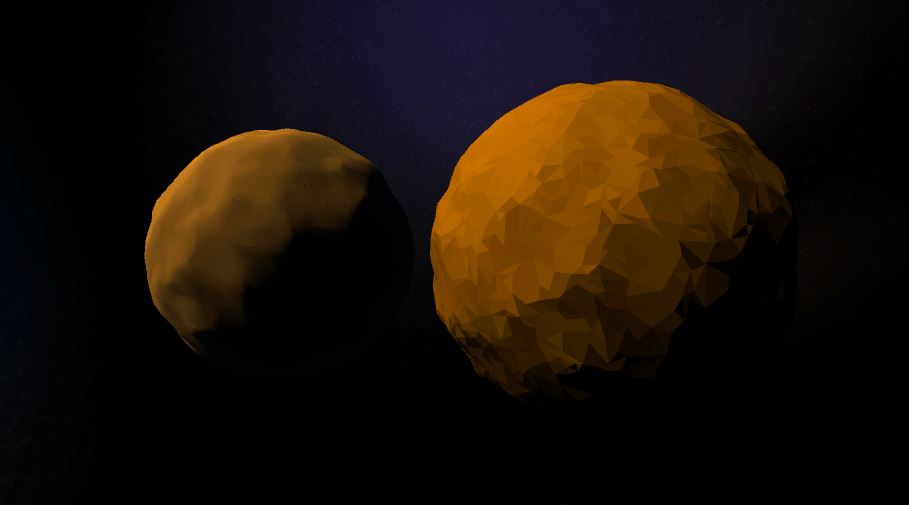
Just starting out with Unity shader programming.

Made this low poly shader:
Unity Basic Low Poly Shader

Code:
Shader "Custom/LowPoly2"
{
 Properties
 {
  _BaseColor ("BaseColor", Color) = (1,1,1,1)
 }
 SubShader
 {
  Tags { "RenderType"="Opaque" "LightMode"="ForwardBase" }
  LOD 100

  Pass
  {
   CGPROGRAM
   #pragma vertex vert
   #pragma geometry geom
   #pragma fragment frag
   
   #include "UnityCG.cginc"
   #include "UnityLightingCommon.cginc"

   struct appdata
   {
    float4 pos : POSITION;
    float3 norm : NORMAL;
   };

   struct v2g
   {
    float4 pos : SV_POSITION;
    float3 norm : TEXCOORD0;
   };

   struct g2f {
    float4 pos : SV_POSITION;
    fixed4 diffColor : COLOR0;
   };
   
   v2g vert (appdata v)
   {
    v2g o;
    o.pos = v.pos;
    o.norm = v.norm;
    return o;
   }

   [maxvertexcount(3)]
   void geom(triangle v2g i[3], inout TriangleStream triStream)
   {
    float3 commonNorm = i[0].norm;
    float4 worldPos = mul(unity_ObjectToWorld, i[0].pos);

    half3 worldNormal = normalize(mul((float3x3)unity_ObjectToWorld, commonNorm));
    half nl = max(0, dot(worldNormal, _WorldSpaceLightPos0.xyz));
    fixed4 diff = nl * _LightColor0;

    g2f o;
    o.pos = mul(UNITY_MATRIX_MVP, i[0].pos);
    o.diffColor = diff;
    triStream.Append(o);

    o.pos = mul(UNITY_MATRIX_MVP, i[1].pos);
    o.diffColor = diff;
    triStream.Append(o);

    o.pos = mul(UNITY_MATRIX_MVP, i[2].pos);
    o.diffColor = diff;
    triStream.Append(o);
   }

   uniform float4 _BaseColor;
   fixed4 frag (g2f i) : SV_Target
   {
    fixed4 mainColor = _BaseColor * i.diffColor;
    return mainColor;
   }
   ENDCG
  }
 }
}

Unity Basic Low Poly Shader

Unity Move Object with Lerp

Unity Move Object with Lerp
You can use Lerp function to move an object automatically. You just need start and end points. Object moves from start to end in time. You can assign start point and end point manually in script or with mouse click. These points may be another objects positions too. Just assign these points, attach this script to an object and let it move.

private float time = 2.0f;
 
 void Update () {
  Vector3 startPoint = new Vector3 (0, 0, 0);
  Vector3 endPoint = new Vector3 (0, 0, 3);
  transform.position = Vector3.Lerp (startPoint, endPoint, time);
  }

Unity Move Object with Lerp

Unity Move, Zoom and Rotate Camera

Unity Move, Zoom and Rotate Camera

Move: It is same as moving character. Just use keyboard buttons and move camera with a float speed variable.
private float speed = 2.0f;
void Update () {
 
  if (Input.GetKey(KeyCode.RightArrow)){
   transform.position += Vector3.right * speed * Time.deltaTime;
  }
  if (Input.GetKey(KeyCode.LeftArrow)){
   transform.position += Vector3.left * speed * Time.deltaTime;
  }
  if (Input.GetKey(KeyCode.UpArrow)){
   transform.position += Vector3.forward * speed * Time.deltaTime;
  }
  if (Input.GetKey(KeyCode.DownArrow)){
   transform.position += Vector3.back * speed * Time.deltaTime;
  }
 }

Zoom: To zoom with scroll wheel, we need scroll wheel input to zoom in or zoom out.
private float zoomSpeed = 2.0f;
 
 void Update () {
 
  float scroll = Input.GetAxis("Mouse ScrollWheel");
  transform.Translate(0, scroll * zoomSpeed, scroll * zoomSpeed, Space.World);
 }

Rotate: I will give an example with mouse button pressed but you can change it with any button or none. Just change or delete if(Input.GetMouseButton(0)).

We need maximum and minimum values for the axes and assign sensitivities.
public float minX = -360.0f;
 public float maxX = 360.0f;
 
 public float minY = -45.0f;
 public float maxY = 45.0f;
 
 public float sensX = 100.0f;
 public float sensY = 100.0f;
 
 float rotationY = 0.0f;
 float rotationX = 0.0f;
 
 void Update () {
 
  if (Input.GetMouseButton (0)) {
   rotationX += Input.GetAxis ("Mouse X") * sensX * Time.deltaTime;
   rotationY += Input.GetAxis ("Mouse Y") * sensY * Time.deltaTime;
   rotationY = Mathf.Clamp (rotationY, minY, maxY);
   transform.localEulerAngles = new Vector3 (-rotationY, rotationX, 0);
  }
 }

Unity Move, Zoom and Rotate Camera

Unity Move Object to Mouse Click Position

Unity Move Object to Mouse Click Position

No matter 2D or 3D, we use same method to move an object to mouse click position. We need to get mouse click position on ground or whatever, and move object to this position. Create a plane and a cube. We will move cube to any position on plane with mouse click. We get the mouse click position with Raycast.

public GameObject cube;
 Vector3 targetPosition;
 
 void Start () {
 
  targetPosition = transform.position;
 }
 void Update(){
 
  if (Input.GetMouseButtonDown(0)){
   Ray ray = Camera.main.ScreenPointToRay(Input.mousePosition);
   RaycastHit hit;
 
   if (Physics.Raycast(ray, out hit)){
    targetPosition = hit.point;
    cube.transform.position = targetPosition;
   }
  }
 }

Attach this code to plane and assign a cube as public game object. Now, press play and test it. Click anywhere on plane and see cube moving.

Unity Move Object to Mouse Click Position

Unity Mouse Click on Game Object

Unity Mouse Click on Game Object

There are two ways to perform click function on a game object:

1- Create and attach a script to the target object. Write this function in it.
void OnMouseDown()
{
 Destroy(gameObject);
}

2- You can use Physics.Raycast to detect target with ray. You must write this code in script which is attached to camera. Be careful, this code works ONLY if the object in scene has collider.
void Update()
{
 if (Input.GetMouseButtonDown(0)){
  Ray ray = Camera.main.ScreenPointToRay(Input.mousePosition);
  RaycastHit hit;
  if (Physics.Raycast(ray, out hit)){
   Destroy(hit.transform.gameObject);
  }
 }
}

Unity Mouse Click on Game Object

Unity Destroy Object by Hit

Unity Destroy Object by Hit

Before implement this code, please check if you add “Rigidbody” component to your objects and “Is Trigger” box is selected. Otherwise, it doesn’t work.

void OnTriggerEnter(Collider c)
{
 if (c.collider.tag == "Enemy")
 {
  Destroy(c.gameObject);
 }
}

Unity Destroy Object by Hit

Open Unity 5 project with right-click on folder

I wrote this little reg file because I was tired of navigating to folders to open them.
Gone are the days of having to go through all the work (tongue in cheek) of opening Unity, navigating to a folder. Now with this registry file, you simply right click on a folder and Open in Unity. If you are using a prior version of Unity (4 or prior) note that your folder will be c:\program files(x86) not c:\program files.

Download this and save it as UnityRightClick.reg (I'll typically save it into notepad and rename the text document). To import it into your registry double click on the file. Note that if you are using Windows and don't have it setup to view your file extensions, you may be trying to execute a text file, not a registry file. Ensure your file ends in .reg and not .txt so Windows will iport this into your registry.

Open Unity 5 project with right-click on folder

Windows Registry Editor Version 5.00

[HKEY_CLASSES_ROOT\Folder\shell\Unity5]
@=""
"Icon"="%ProgramFiles%\\Unity\\Editor\\Unity.exe"
"MUIVerb"="Open as Unity Project"

[HKEY_CLASSES_ROOT\Folder\shell\Unity5\Command]
@="cmd /c start /D\"c:\\Program Files\\Unity\\Editor\\\" Unity.exe -projectPath \"%1\""

Source:
http://www.adamtuliper.com/2015/06/open-unity-5-project-with-right-click.html

Unity Character Control with Keyboard

Unity Character Control with Keyboard

I will show you 2 ways to move your character with keyboard.

Unity Hello World

When you open Unity 3D, you will see a window like this. Under the “Hierarchy” title, a main camera is created as default and you can create your objects in here and see it in “Scene” window. In Scene window, you can move, rotate and resize your objects. When you select an object, its specifications will be shown in “Inspector” window. And if you press play button, your game runs in “Game” window. “Project” window includes all materials of your project such as images, materials, prefabs, scripts etc. You can change layout style by the options at top-left. Are you ready to say “Hello World”?

Click “Create” button under project title and create a C# script. Rename it as “HelloWorld”. Double-click on it and “Mono Develop” will be open as default if you don’t use another compiler. Type
Debug.Log("Hello World");

in Start function and save it. Back to Unity, drag HelloWorld script into the Main camera and press play. You will see our text in “Console” window. Functional scripts should be attached in a game object in scene to be used.

Unity Tile-Based Ground

Tile-Based Ground – Unity3D (C#)

To create a tile-based ground, we need a simple matrix system. A (row X column) matrix will take a plane texture and draw it in each cell.

public GameObject plane;
public int width = 10;
public int height = 10;

private GameObject[,] grid = new GameObject[30, 30];

void Start () {
 for (int x =0; x < width; x++) {
  for (int y =0; y < height; y++){
   GameObject gridPlane = (GameObject)Instantiate(plane);
   gridPlane.transform.position = new Vector2(gridPlane.transform.position.x + x, 
                gridPlane.transform.position.y + y);
   grid[x, y] = gridPlane;
  }
 }
}

Tile-Based Ground – Unity3D (C#)

Unity Grid System

Grid System – Unity3D (C#)

Grid system is used mostly in RTS games. Your characters or buildings move on grids. You need a matrix to create a grid system

public float cell_size = 2.0f;
 
private float x, y, z;

void Start() {
 x = 0f;
 y = 0f;
 z = 0f;
 
}

void Update () {
 x = Mathf.Round(transform.position.x / cell_size) * cell_size;
 y = Mathf.Round(transform.position.y / cell_size) * cell_size;
 z = transform.position.z;
 transform.position = new Vector3(x, y, z);
}

Grid System – Unity3D (C#)

Draw grid on the terrain in Unity

How to Draw grid on the terrain in Unity Tutorial

Drawing grid on the terrain is used in lot of game genres – RTS, Simulation, Tower defense, etc. It can be done very easily in Unity.

How to Create Simple Timer

Unity How to Create Simple Timer C#


A visible or background timer runs on most games. We will create an easy one which ticks seconds. In this tutorial we don’t use any value such as integer, float etc. We just need a GUI text. Let’s create.

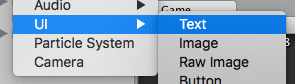
Open your project and create a GUIText. Right-Click on hierarchy window, UI/Text.

Unity How to Create Simple Timer C#

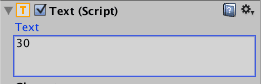
Edit its text. This step is important because we will use this text. Set it as your timer beginning value.

Unity How to Create Simple Timer C#

Now create a C# script. In this script, we are going to take the value of GUIText and decrease it by 1 every second. Don’t forget to implement using UnityEngine.UI; lib because Text needs it.

public class Timer : MonoBehaviour {
 
	public Text scoreText;
 
	void Start () {
		InvokeRepeating("RunTimer", 1, 1);
	}
 
	void RunTimer() {
		scoreText.text = (int.Parse(scoreText.text) - 1).ToString();
	}
}

That’s it. Set your UI text as scoreText and run it. We got a “seconds” timer with a simple logic.

You can display gizmos in the game window

Unity: You can display gizmos in the game window


You can display gizmos in the game window just like you can do in the scene window.