Showing posts with label Tips. Show all posts

Unity Move Object with Lerp

Unity Move Object with Lerp
You can use Lerp function to move an object automatically. You just need start and end points. Object moves from start to end in time. You can assign start point and end point manually in script or with mouse click. These points may be another objects positions too. Just assign these points, attach this script to an object and let it move.

private float time = 2.0f;
 
 void Update () {
  Vector3 startPoint = new Vector3 (0, 0, 0);
  Vector3 endPoint = new Vector3 (0, 0, 3);
  transform.position = Vector3.Lerp (startPoint, endPoint, time);
  }

Unity Move Object with Lerp

Unity Move, Zoom and Rotate Camera

Unity Move, Zoom and Rotate Camera

Move: It is same as moving character. Just use keyboard buttons and move camera with a float speed variable.
private float speed = 2.0f;
void Update () {
 
  if (Input.GetKey(KeyCode.RightArrow)){
   transform.position += Vector3.right * speed * Time.deltaTime;
  }
  if (Input.GetKey(KeyCode.LeftArrow)){
   transform.position += Vector3.left * speed * Time.deltaTime;
  }
  if (Input.GetKey(KeyCode.UpArrow)){
   transform.position += Vector3.forward * speed * Time.deltaTime;
  }
  if (Input.GetKey(KeyCode.DownArrow)){
   transform.position += Vector3.back * speed * Time.deltaTime;
  }
 }

Zoom: To zoom with scroll wheel, we need scroll wheel input to zoom in or zoom out.
private float zoomSpeed = 2.0f;
 
 void Update () {
 
  float scroll = Input.GetAxis("Mouse ScrollWheel");
  transform.Translate(0, scroll * zoomSpeed, scroll * zoomSpeed, Space.World);
 }

Rotate: I will give an example with mouse button pressed but you can change it with any button or none. Just change or delete if(Input.GetMouseButton(0)).

We need maximum and minimum values for the axes and assign sensitivities.
public float minX = -360.0f;
 public float maxX = 360.0f;
 
 public float minY = -45.0f;
 public float maxY = 45.0f;
 
 public float sensX = 100.0f;
 public float sensY = 100.0f;
 
 float rotationY = 0.0f;
 float rotationX = 0.0f;
 
 void Update () {
 
  if (Input.GetMouseButton (0)) {
   rotationX += Input.GetAxis ("Mouse X") * sensX * Time.deltaTime;
   rotationY += Input.GetAxis ("Mouse Y") * sensY * Time.deltaTime;
   rotationY = Mathf.Clamp (rotationY, minY, maxY);
   transform.localEulerAngles = new Vector3 (-rotationY, rotationX, 0);
  }
 }

Unity Move, Zoom and Rotate Camera

Unity Move Object to Mouse Click Position

Unity Move Object to Mouse Click Position

No matter 2D or 3D, we use same method to move an object to mouse click position. We need to get mouse click position on ground or whatever, and move object to this position. Create a plane and a cube. We will move cube to any position on plane with mouse click. We get the mouse click position with Raycast.

public GameObject cube;
 Vector3 targetPosition;
 
 void Start () {
 
  targetPosition = transform.position;
 }
 void Update(){
 
  if (Input.GetMouseButtonDown(0)){
   Ray ray = Camera.main.ScreenPointToRay(Input.mousePosition);
   RaycastHit hit;
 
   if (Physics.Raycast(ray, out hit)){
    targetPosition = hit.point;
    cube.transform.position = targetPosition;
   }
  }
 }

Attach this code to plane and assign a cube as public game object. Now, press play and test it. Click anywhere on plane and see cube moving.

Unity Move Object to Mouse Click Position

Unity Destroy Object by Hit

Unity Destroy Object by Hit

Before implement this code, please check if you add “Rigidbody” component to your objects and “Is Trigger” box is selected. Otherwise, it doesn’t work.

void OnTriggerEnter(Collider c)
{
 if (c.collider.tag == "Enemy")
 {
  Destroy(c.gameObject);
 }
}

Unity Destroy Object by Hit

Open Unity 5 project with right-click on folder

I wrote this little reg file because I was tired of navigating to folders to open them.
Gone are the days of having to go through all the work (tongue in cheek) of opening Unity, navigating to a folder. Now with this registry file, you simply right click on a folder and Open in Unity. If you are using a prior version of Unity (4 or prior) note that your folder will be c:\program files(x86) not c:\program files.

Download this and save it as UnityRightClick.reg (I'll typically save it into notepad and rename the text document). To import it into your registry double click on the file. Note that if you are using Windows and don't have it setup to view your file extensions, you may be trying to execute a text file, not a registry file. Ensure your file ends in .reg and not .txt so Windows will iport this into your registry.

Open Unity 5 project with right-click on folder

Windows Registry Editor Version 5.00

[HKEY_CLASSES_ROOT\Folder\shell\Unity5]
@=""
"Icon"="%ProgramFiles%\\Unity\\Editor\\Unity.exe"
"MUIVerb"="Open as Unity Project"

[HKEY_CLASSES_ROOT\Folder\shell\Unity5\Command]
@="cmd /c start /D\"c:\\Program Files\\Unity\\Editor\\\" Unity.exe -projectPath \"%1\""

Source:
http://www.adamtuliper.com/2015/06/open-unity-5-project-with-right-click.html

Unity Character Control with Keyboard

Unity Character Control with Keyboard

I will show you 2 ways to move your character with keyboard.

Unity Hello World

When you open Unity 3D, you will see a window like this. Under the “Hierarchy” title, a main camera is created as default and you can create your objects in here and see it in “Scene” window. In Scene window, you can move, rotate and resize your objects. When you select an object, its specifications will be shown in “Inspector” window. And if you press play button, your game runs in “Game” window. “Project” window includes all materials of your project such as images, materials, prefabs, scripts etc. You can change layout style by the options at top-left. Are you ready to say “Hello World”?

Click “Create” button under project title and create a C# script. Rename it as “HelloWorld”. Double-click on it and “Mono Develop” will be open as default if you don’t use another compiler. Type
Debug.Log("Hello World");

in Start function and save it. Back to Unity, drag HelloWorld script into the Main camera and press play. You will see our text in “Console” window. Functional scripts should be attached in a game object in scene to be used.

Unity Tile-Based Ground

Tile-Based Ground – Unity3D (C#)

To create a tile-based ground, we need a simple matrix system. A (row X column) matrix will take a plane texture and draw it in each cell.

public GameObject plane;
public int width = 10;
public int height = 10;

private GameObject[,] grid = new GameObject[30, 30];

void Start () {
 for (int x =0; x < width; x++) {
  for (int y =0; y < height; y++){
   GameObject gridPlane = (GameObject)Instantiate(plane);
   gridPlane.transform.position = new Vector2(gridPlane.transform.position.x + x, 
                gridPlane.transform.position.y + y);
   grid[x, y] = gridPlane;
  }
 }
}

Tile-Based Ground – Unity3D (C#)

Unity Grid System

Grid System – Unity3D (C#)

Grid system is used mostly in RTS games. Your characters or buildings move on grids. You need a matrix to create a grid system

public float cell_size = 2.0f;
 
private float x, y, z;

void Start() {
 x = 0f;
 y = 0f;
 z = 0f;
 
}

void Update () {
 x = Mathf.Round(transform.position.x / cell_size) * cell_size;
 y = Mathf.Round(transform.position.y / cell_size) * cell_size;
 z = transform.position.z;
 transform.position = new Vector3(x, y, z);
}

Grid System – Unity3D (C#)

Draw grid on the terrain in Unity

How to Draw grid on the terrain in Unity Tutorial

Drawing grid on the terrain is used in lot of game genres – RTS, Simulation, Tower defense, etc. It can be done very easily in Unity.

How to Create Simple Timer

Unity How to Create Simple Timer C#


A visible or background timer runs on most games. We will create an easy one which ticks seconds. In this tutorial we don’t use any value such as integer, float etc. We just need a GUI text. Let’s create.

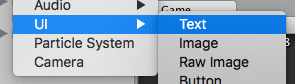
Open your project and create a GUIText. Right-Click on hierarchy window, UI/Text.

Unity How to Create Simple Timer C#

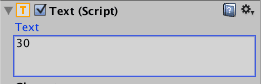
Edit its text. This step is important because we will use this text. Set it as your timer beginning value.

Unity How to Create Simple Timer C#

Now create a C# script. In this script, we are going to take the value of GUIText and decrease it by 1 every second. Don’t forget to implement using UnityEngine.UI; lib because Text needs it.

public class Timer : MonoBehaviour {
 
	public Text scoreText;
 
	void Start () {
		InvokeRepeating("RunTimer", 1, 1);
	}
 
	void RunTimer() {
		scoreText.text = (int.Parse(scoreText.text) - 1).ToString();
	}
}

That’s it. Set your UI text as scoreText and run it. We got a “seconds” timer with a simple logic.

You can display gizmos in the game window

Unity: You can display gizmos in the game window


You can display gizmos in the game window just like you can do in the scene window.

Use Layers popup to lock objects and control visibility

Unity Use Layers popup to lock objects and control visibility


By placing your objects on different layers you can control if these objects should be locked on your scene or not. It may be a good idea to lock layers that you don’t want to move by accident (like ground game object). In order to lock a layer, use the Layers popup that is located in the top-right corner of your Unity editor.

Use [SerializeField] and [Serializable] properties to control class serialization

Unity: Use [SerializeField] and [Serializable] properties to control class serialization


By default Unity serializes supported public fields and ignores all private fields. You can control that behavior using [SerializeField] and [Serializable] attributes.
[SerializeField]
private int accumulator; // it will be serialized too!

You can also do the opposite – having a public field, but its value shouldn’t be stored.
[NonSerialized]
public float currentHealth;

If you want to create a custom inner type (inside another class) and serialize it inside it, you must add to it a [Serializable] attribute.

class World : MonoBehaviour {
 public Bot[] bots;
 
 [Serializable]
 public class Bot {
  public string name;
  public int health = 100;
 
  [SerializeField] // you can use it here too!
  private int somethingHidden = 5;
 }
}

Please refer to the Unity3D documentation to read more about [SerializeField], its limitation, and possibilities.

Unity Reset Transform values with only two clicks

Unity Reset Transform values with only two clicks

When creating new Game Object its transform values are set in a way that you can see this new object in your Scene window. If you want it to be a container for other objects or this should be just an empty management object with scripts attached, it is strongly recommended to place it at local 0, 0, 0 with no rotation and the default scale.

Use Game Object icons to clarify your scene view

Unity Use Game Object icons to clarify your scene view


For all your game objects you can define how it should look like in the scene view, even if this game object doesn’t have any renderer attached. For this purpose you can use nameless icon:

Use Export Package option to share your work

If you’re not working alone, you need to find a way to share your project files with other people. Unity project files consists on hidden (by default) meta files which are responsible for keeping references. This is the reason why copying your Assets folder won’t work at all. Unity comes with unitypackage format that preserves all references between files and can be freely shared.

Hold ALT while opening Unity to open Project Wizard

If you don’t want to open the last project when opening Unity, just hold the ALT button when clicking on the Unity icon on your desktop (or right away after the double-click).

Hold ALT while opening Unity to open Project Wizard

The Project Wizard allows you to create a new project or open an existing one.

3 Unity Optimization Tips

3 Unity3D Optimization Tips

We are nearing the end of our current project, and as such I am starting to look into optimizations. What better time to share some little-known Unity facts with others than right now?